Sewing Front Armhole Much Larger Than Back Armhole

THE Q & A SERIES - HOW TO INCREASE BICEP WIDTH ON A SLEEVE- PART 2
Hi Emily, I'd like to know how to increase sleeve bicep width. I've made grainline uniform several times with what I think is the right way to increase the sleeve but am not completely happy with the results. Thanks, Kerrie Kenthurst, Australia.
Hi Kerrie,
Last week I showed you how to make this adjustment for an alteration of up to 3cm (1 1/4in) and today I'm popping in with a tutorial for larger alterations (more than 3cm / 1 1/4in). If you would like a refresher, you can see the first post here.
I will be using the Peppermint wrap top pattern for the example, which you can download for free if you would like to give this technique a go.
PREPARE YOUR PATTERN

Step 1
Take the SLEEVE piece from the pattern. As you need to add more than 3cm (1 1/4in) to the bicep width, you will need to take a copy of your pattern - as you will need the original sleeve pattern later on in the tutorial. Alternatively you could print another copy of the sleeve from the PDF.
Step 2
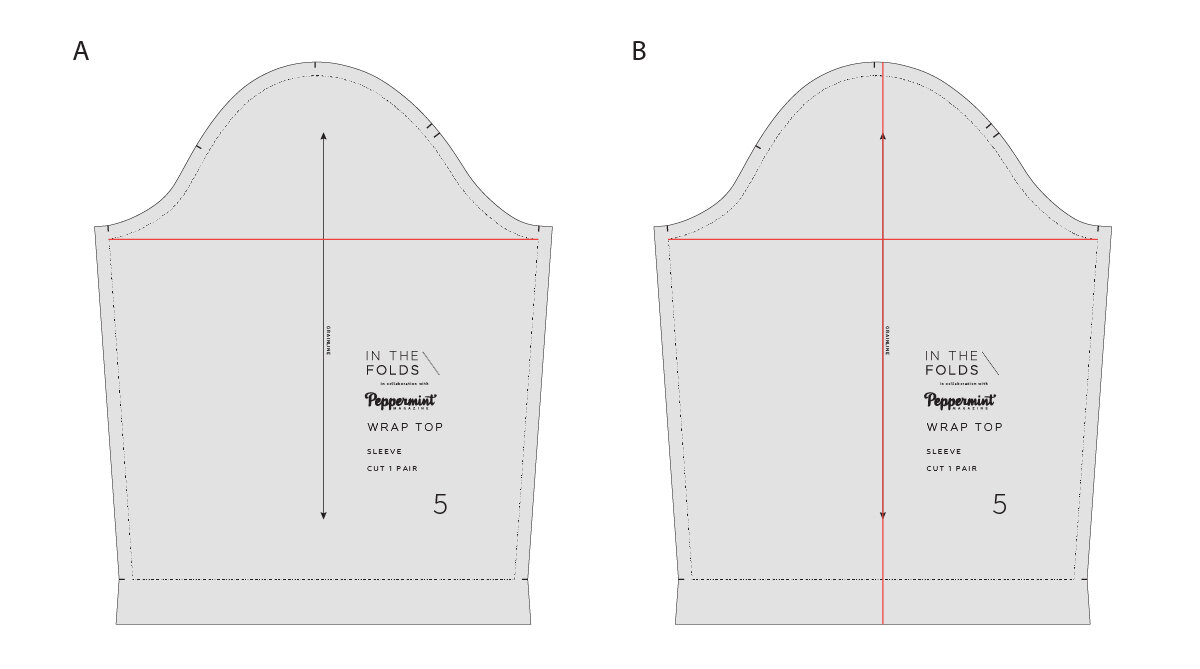
A. Mark in your bicep line on the pattern piece. To do this, draw a straight line across your sleeve pattern piece - from the top of the underseam on one side to the top of the underseam on the other.
B. Mark the centre of the BICEP LINE and draw a vertical line through the centre of the line to each end of the pattern piece (making sure that the new line is perpendicular to the BICEP LINE). On this particular pattern, the grainline is marked in the centre of the sleeve piece, so you can simply extend the grainline.
CUT THE PATTERN PIECE

Step 3
Cut along the vertical line marked on the pattern. You won't be able to just cut through from top to bottom, as you need to leave some small "hinges" of paper intact to make the adjustment. To cut this line, without cutting in from the bottom or top, you may choose to fold the pattern in half to access the line, or use a ruler and rotary cutter. You need to cut from the point where the vertical line on the sleeve meets the sleeve cap (on the stitch line) and meets the hem (also on the stitch line). As you approach the stitch line on each end of the line, go nice and slow and stop 1-2mm from the end.

Step 4
Cut across the BICEP LINE, in the same way you cut along the vertical line - stopping 1-2mm from each end.

Step 5
Cut into the seam allowance on both the vertical line and the BICEP LINE, towards the points where you stopped cutting. Leave a small 1-2mm "hinge" of paper at each point (a hinge in this sense is a small bit of paper that allows you to adjust patterns, whilst still keeping the outer edge of the pattern piece intact).
Carefully put your sleeve piece to one side for a moment (it will be quite delicate due to the cuts made).

Step 6
Take a piece of pattern paper and draw a vertical and a horizontal line (that cross over). The lines need to be longer / wider than the sleeve pattern piece. The horizontal line indicates the BICEP LINE.

Step 7
Take the amount you would like to add to the bicep width on your pattern and divide by 2. Distribute this amount evenly on either side of the vertical line at the BICEP LINE.
For example, I will be adding 4cm (1 1/2in) to the bicep width. That means I need to add 2cm (3/4in) on each side of the vertical line.
MAKE THE ALTERATION

Step 8
Carefully place your sleeve pattern piece on top of the piece of paper marked in Steps 6-7. Line up the BICEP LINE on the pattern piece with the BICEP LINE on the piece of paper and line up the vertical lines.

Step 9
To make the adjustment, carefully move each side of the pattern out, being very careful to keep everything aligned on the vertical line and BICEP LINE. It can help to put a weight (or just your finger) in the centre of the hem to ensure the pattern remains aligned to the vertical line.

Step 10
As you move the sides of the pattern piece out, you will notice that the top of the sleeve cap starts moving down and the cut sections of your pattern piece begin to overlap - as a space opens up in the centre. Continue moving the sides of your pattern piece out on the BICEP LINE until the edges of the opening meet the points marked in Step 7.
Check that the BICEP LINE is now the desired length. Adjust if necessary.
Tape or glue in place.
RE-DRAFT THE SLEEVE CAP

Step 11
This is the point where this tutorial changes slightly from the last one. As you can see, as more width is added to the bicep in the centre, the more skewed the sleeve cap becomes. You can also see that the height of the sleeve cap keeps reducing, as you add more to the bicep width.
In the example, I have marked the original sleeve cap height in comparison to the altered sleeve. There is a 3.5cm difference between the two, which is quite a lot when it comes to sleeve caps. I'd say that in most cases, you won't be in a position to lose this much of the sleeve cap height, which is why in the following steps I will show you how to add this back on.

Step 12
Take the original sleeve pattern and place it on top of your altered sleeve - lining up the vertical line and the BICEP LINE. Use pattern weights to hold in place.

Step 13
Take a tracing wheel and trace the sleeve cap (stitch line) from the original pattern onto the altered pattern.
If you don't have a tracing wheel, you can trace the outer edge of the original sleeve pattern with a pencil - just remember that you have traced the cutting edge, rather than the stitch line in the following steps.

Step 14
Remove the original sleeve piece and trace over your tracing wheel markings with a pencil and french curve.

Step 15
Take a tape measure (and hold it on its side), and measure the length of your new sleeve cap in two parts. Measure the front sleeve cap (the curve on the left side of the vertical line - marked with a single notch) and take note of the measurement. Measure the back of the sleeve cap (the part of the sleeve cap that is on the right side of the vertical line - marked with a double notch) and take note of the measurement.
You will notice that this alteration has increased the length of the sleeve cap. We now need to adjust the front and back armhole of the pattern so that the new sleeve fits into the armhole of the pattern.
ALTER THE ARMHOLES
Step 16
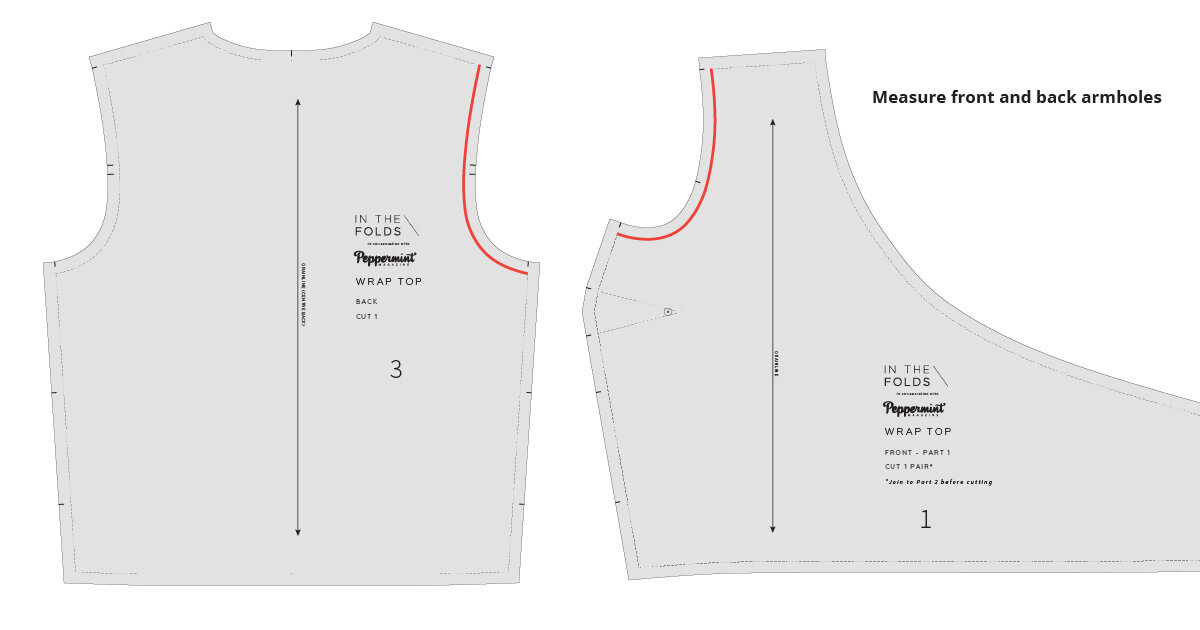
Take the FRONT and BACK pattern pieces from your pattern and measure the front and back armholes (again - use a tape measure placed on it's side to follow the curves). Take note of these two measurements.
The front sleeve cap measurement should be equal to the front armhole measurement plus 6mm (1/4in) ease. The sleeve cap has 1.2cm (1/2in) total ease in the sleeve cap (this means that the sleeve cap is slightly longer than the armhole to allow for a nice shape in the sleeve over the shoulder when the sleeve is set in).
Work out how much you need to add to the length of your front armhole by taking the front sleeve cap measurement (from your altered sleeve) and deducting the 6mm (1/4in) ease. This length is how long you need the front armhole to be.
For example, the front of my altered sleeve cap measures 27.8cm. I need to deduct half the total ease from this (ie. 6mm / 1/2in) which equals 27.2cm. I need to alter my front armhole to measure 27.2cm in length (this is 3cm longer than the original front armhole line).
Repeat process to find the new back armhole length.

Step 17
To re-draw the armholes (at the new longer length), start by taking the amount you added to the bicep and dividing by 2.
Take this measurement and mark a point this far down the side seam - measuring down from the armhole, on the stitch line.
For example, in the example I added 4cm (1 1/2in). Half of this is 2cm (3/4in), so the point I marked is 2cm (3/4in) down the side seam. Next, mark a point this same length out from the point on the side seam (perpendicular to the side seam).
This will create a rough guide for you to re-draw the armhole.

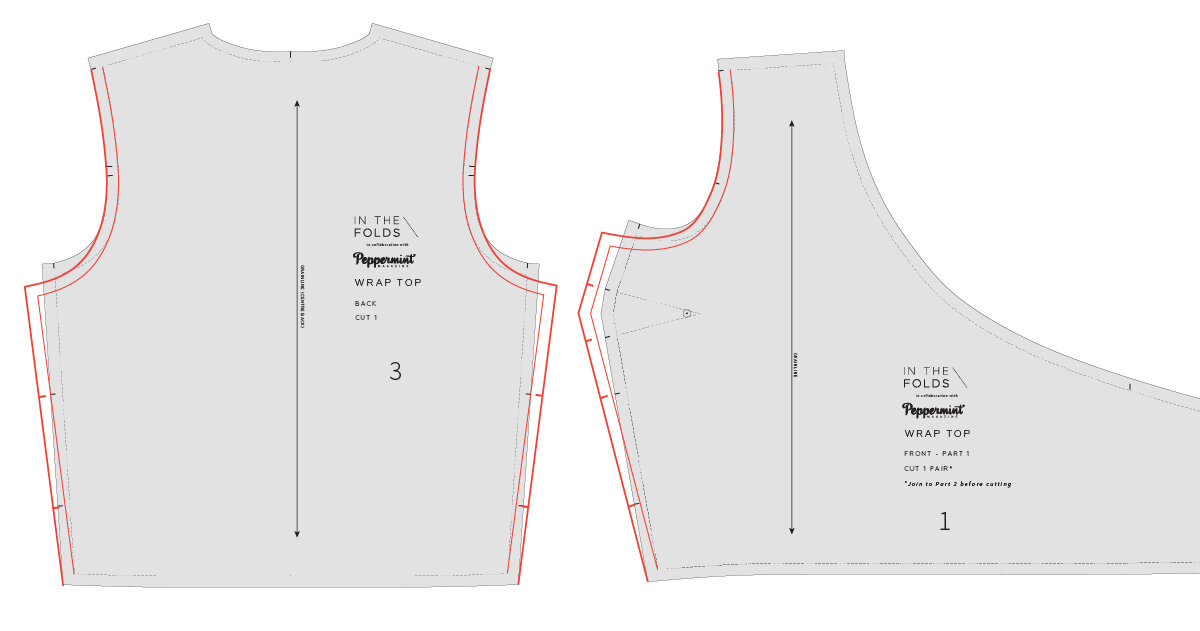
Step 18
Re-draw the armholes by starting the new armhole at the outer point marked, going through the point marked on the side seam and then gradually easing back towards the original armhole line. This is a great opportunity to use a french curve, if you've got one.
Take your tape measure and check that the length of the armhole lines are correct - adjust if necessary (it is more important that the lines are the correct length, rather than being exactly in line with the points marked in Step 17 - these are just guidelines to get you started).

Step 19
Connect the new armhole line to the original side seam, by taking a ruler and marking a diagonal line from the bottom of the original side seam to the new armhole point. To do this on the front side seam you will first need to fold out the dart.
FINALISE THE PATTERN
Step 20
It's a good idea to check and true your seams (make sure the front and back side seams fit together nicely and the sleeve fits nicely into the armhole) before adding seam allowance back onto your armholes and side seams.
Transfer any of the notches that have been lost in the process to the new cutting line.

Step 21
Go back to your sleeve and do the same - add back on the seam allowance and transfer any notches that were lost in the process. Be sure to walk your sleeve into the armhole to ensure you have the sleeve cap notches in the correct position.
I hope that helps you next time you need to adjust the bicep line on a pattern!
Happy sewing,
Emily
resources mentioned in this issue
-
How to increase bicep width on a sleeve - Part 1. Tutorial can be found here.
-
The Peppermint wrap top pattern can be downloaded for free here.
-
How to add dart shaping.Tutorial can be found here.
-
Checking patterns : Curved seams. Tutorial can be found here.
What you've been making
More posts in the series
Sewing Front Armhole Much Larger Than Back Armhole
Source: https://inthefolds.com/q-a-series/2020/10/04how-to-increase-bicep-width-on-a-sleeve-part-2
0 Response to "Sewing Front Armhole Much Larger Than Back Armhole"
Post a Comment